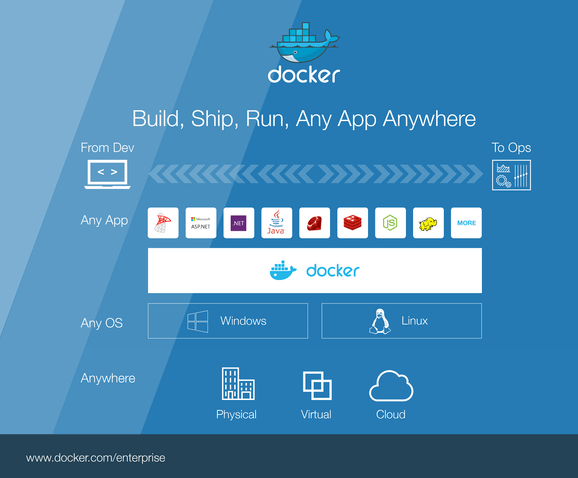
I’ve been playing around with Docker (more specifically with SQL Server on Linux) the beginning of 2017 to see if indeed I can “Build, Ship, Run, Any App Anywhere” and will be putting together a series of how-to’s and issues experienced so you guys don’t spend the countless hours trying to investigate and work out what is going on when things do not work.
I’ll be adding links to this main page as and when new posts are added as a central point of reference.
PLEASE NOTE: The generated content in this blog post has in no way shape or form been verified for correctness and purely used as an example of what can be generated, please do not take what the AI model has generated as verbatim
Well, no idea where to start with this.
I’m not an AI specialist but the growth in popularity and valuation of OpenAI since it launched it’s ChatGPT back in November 2022 has been mind boggling. I’ve only just started playing around with it and various other options after seeing some blogs, LinkedIn content and even eBooks on Power BI being written using these tools.
So, I thought I’d generate a blog post purely using copy.ai (others are available) and see how easy it is and what sort of content it turns out. No reason in particular why I chose copy.ai as opposed to OpenAI/ChatGPT
The process:
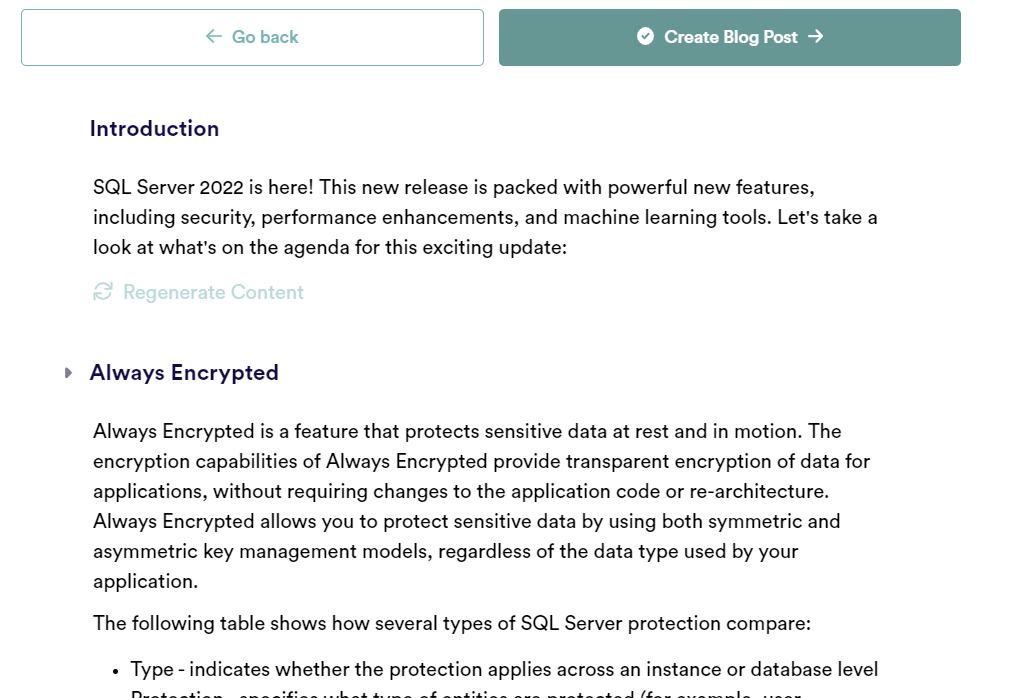
Once you have navigated to copy.ai and registered, you are presented with a number of options for generating various content types. I chose “Blog Post Wizard”
You will now be presented with a couple of text boxes whereby you can enter a blog post title, some keywords and a tone that the model can use to generate the text. I chose a series of keywords of features for SQL Server, generated from Open.AI when I asked the question, “What are the new Features of SQL Server 2022”.
NOTE: Although those keywords generated are in fact features of SQL Server, they’re not necessarily “New” features but for simplicity I just went with it.
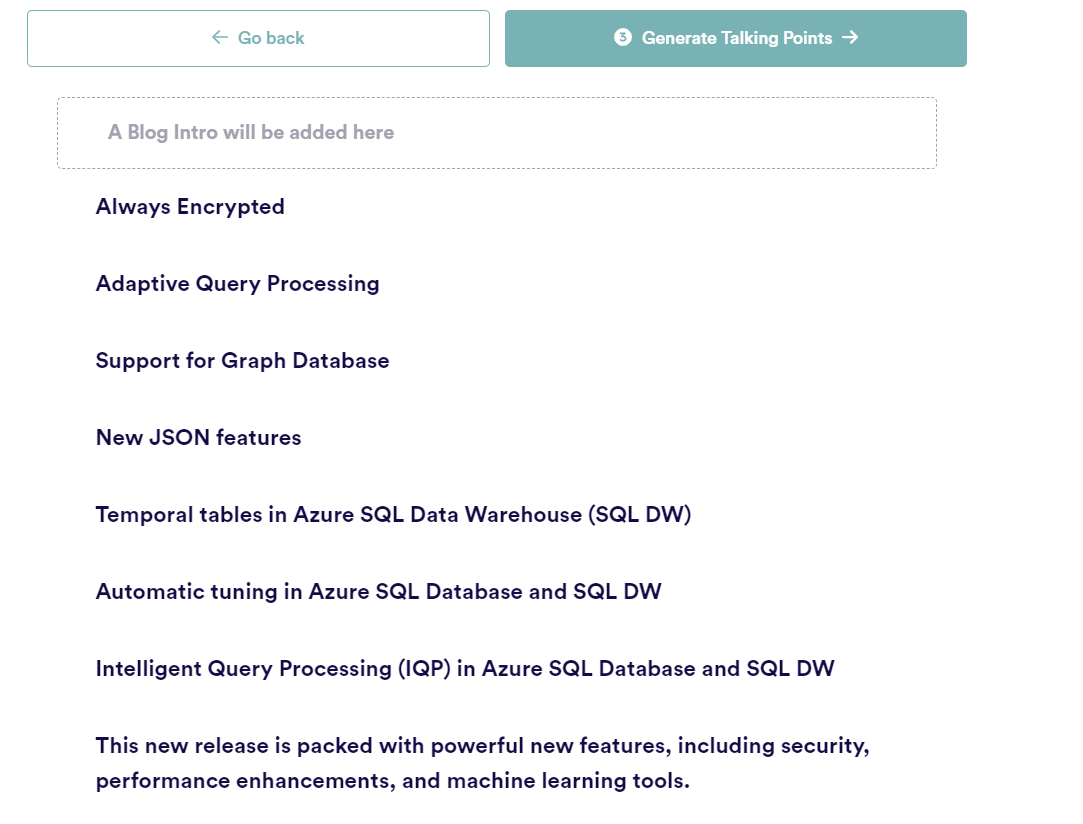
Click Generate Outline and you will be presented with an outline for the blog post. At this point, you will notice that there are a number of new items in the list, not just those in the keywords I entered previously 😲
Click “Generate talking points” and you will now have a bullet point list of, erm, talking points regarding each of the Outlined points:
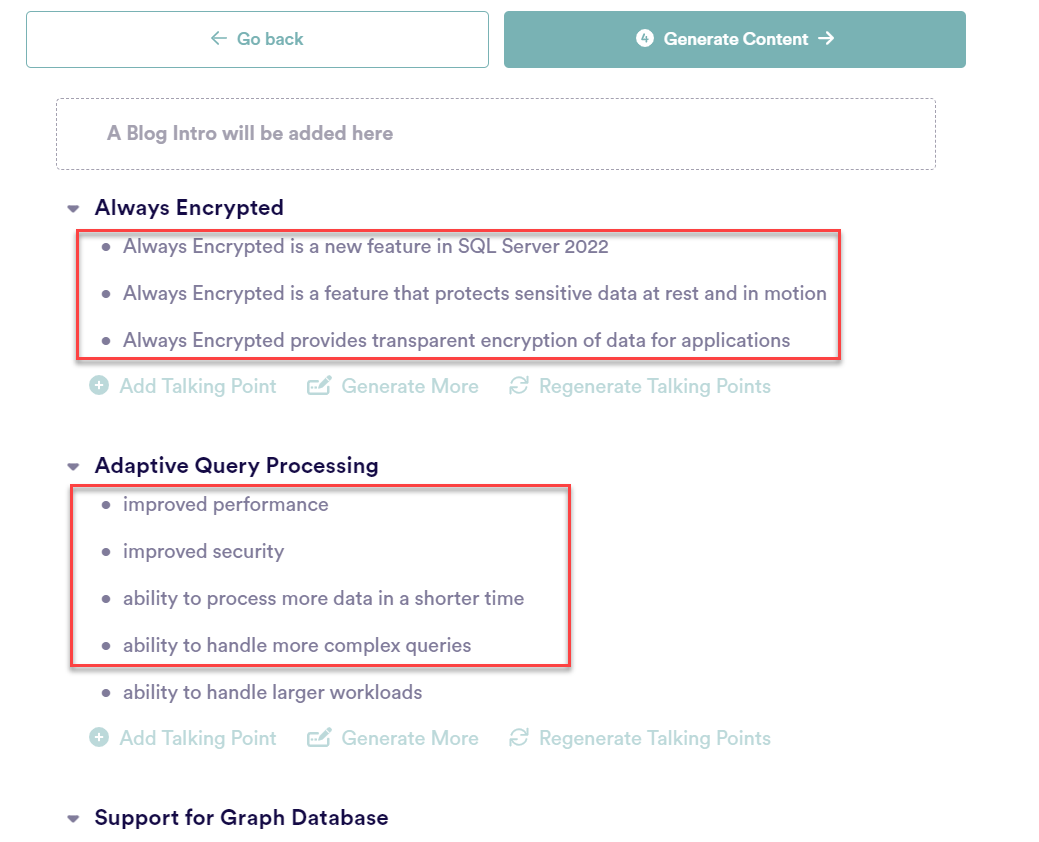
Generate Content and you will now see each of the talking points is now padded out with content, giving you the option to “Regenerate Content” for sections you’re not 100% happy with – essentially your blog post is now written!
Click “Create Blog Post” and you will now have the blog post whereby you can modify / format as required😲😲😲😲😲😲😲😲😲
Simple as that!
Below is a copy and paste of the first time I went through it with a few regenerates of content to see the changes but I have done this twice and although both are largely the same, you can see the Introductions are slightly different:
Generate Blog #1
Generate Blog #2
Everything from this point, apart from the SQLGeordie Conclusion is generated content from copy.ai
<< Start copy.ai generated content >>
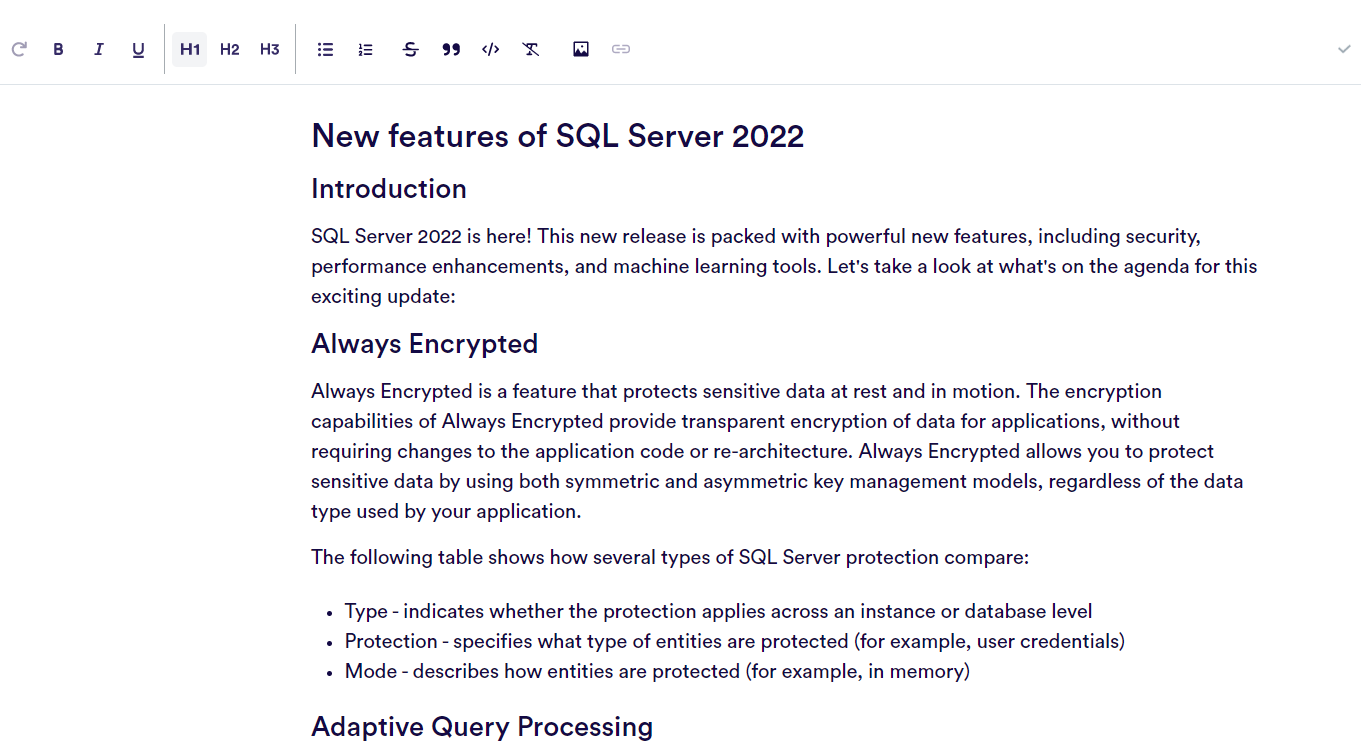
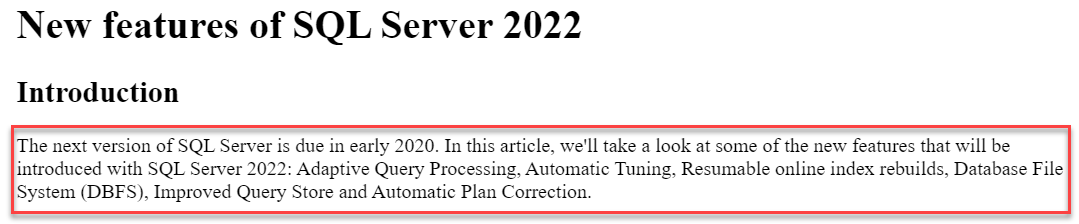
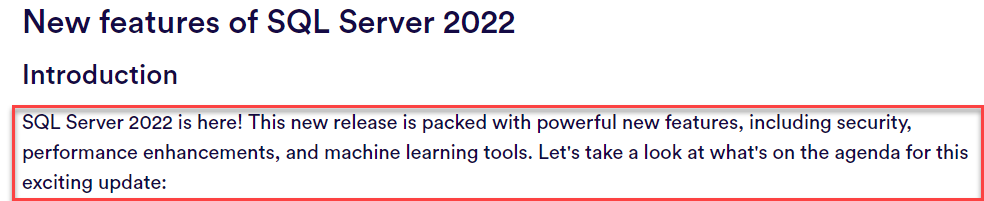
New features of SQL Server 2022
Introduction
The next version of SQL Server is due in early 2020. In this article, we’ll take a look at some of the new features that will be introduced with SQL Server 2022: Adaptive Query Processing, Automatic Tuning, Resumable online index rebuilds, Database File System (DBFS), Improved Query Store and Automatic Plan Correction.
Adaptive Query Processing
What is Adaptive Query Processing?
Adaptive Query Processing (AQP) allows queries to be processed in a way that best suits their needs, without having to specify an exact parameterization. This means that you no longer have to worry about whether your query will use parallelism or serial execution—the database will automatically determine the best way to run your query based on the workload and hardware available at the time it runs. This capability can significantly improve query performance for applications that need high-throughput queries, including those where data volumes are growing rapidly and where servers are under heavy load. It also enables very fast responses from analytics workloads running on SQL Server 2022 clusters with many nodes running queries simultaneously in parallel mode using only one node’s resources while providing maximum throughput among all nodes running in parallel mode.
Automatic Tuning
Automatic Tuning is a feature of SQL Server 2022 that helps optimize query performance. It uses Azure Machine Learning to tune queries by learning the statistics about the data and the queries.
This feature works with Azure Machine Learning to use machine learning to optimize query performance. This can help you improve your systems based on what they have learned, rather than having someone do it manually. Automatic tuning uses the same technology as Azure SQL Database, which means that if you’re using Azure SQL Database already then this feature will be familiar when it becomes available in SQL Server 2022.
Resumable online index rebuild
One of the new features in SQL Server 2022 is resumable online index rebuild. It allows you to rebuild indexes online without stopping the database and without blocking queries.
With this feature, you can continue to use your database while the index is being rebuilt—you can even submit new queries that read from the table while it’s being rebuilt. The query will be blocked until the rebuild completes (and once it does, a completion notification will be sent back to your application).
Rebuilding indexes is important because it reduces fragmentation and improves performance across many workloads. If a table has been updated frequently and contains lots of updates but few deletes or inserts, its indexes are likely fragmented and need rebuilding regularly—it’s like having an old car with a bad oil pan: You may not notice when driving around town on sunny days, but if anything happens that pushes your engine temperature past normal operating limits (like hitting traffic or driving uphill), then things could start getting messy pretty quickly!
Database File System (DBFS)
Database File System (DBFS) is a file system that is built on top of SQL Server. It allows you to store data in files instead of tables, which can be useful for storing backup files, large datasets, and other data. With DBFS, you can access the data from various applications using standard file system APIs.
Improved Query Store
Query Store is a feature in SQL Server that allows you to record queries, plan usage and performance details, and then use that information in the future to improve performance.
Query Store captures information about query plans and store them in a data store. You can monitor these query plans and track how they change over time so that you can learn which changes were beneficial to your workloads.
Automatic Plan Correction
Automatic Plan Correction is a new feature in SQL Server 2022 that will improve query performance by automatically correcting the plan of a query to make it more efficient. For example, if your database has not been tuned properly and you run an inefficient query against it, Automatic Plan Correction can detect this and correct the plan of your query to make it more efficient.
In-memory OLTP enhancements
In-memory OLTP is a feature of SQL Server that allows data to be stored in memory instead of on disk. This can improve performance because there is no disk latency involved in reading and writing data.
In-memory OLTP is used for high transaction processing, real-time transactional processing, and large data sets.
SQL Server 2022 will include several new features and functions such as Adaptive Query Processing, Always Encrypted, Always On Availability Groups, and more.
SQL Server 2022 will include several new features and functions such as Adaptive Query Processing, Always Encrypted, Always On Availability Groups, and more.
This means that you can automatically optimize queries without having to take your hands off the keyboard. The system will run them through analysis tools to see which one is most efficient for your system to process.
Conclusion
With the release of SQL Server 2022, we are bringing new features and improvements to our customers. In addition to enhanced security, performance, and scalability features, we are also introducing innovative features such as Azure Data Sync (ADS) which enables hybrid cloud data replication between on-premises databases and Azure SQL Database instances.
<< End copy.ai generated content >>
SQLGeordie Conclusion
I haven’t read through this fully line by line to scrutinise it but from skimming it, it’s actually a pretty good attempt. All in all, it took < 5mins to generate something that would take hours to generate, review, change, re-review etc etc. I think with a full review, bit of tweaking then it could be thrown out into the wild quite easily. I personally don’t think it flows as well as a blog post probably could/should do but purely based on content, it has done a good job.
Although the AI technology itself is phenomenal and indeed, very scary to see how far we’ve come so quickly – Is this the future for content generation? I’m inclined to say it certainly will be a big part of social media content, as to whether it’ll take over technical content written by really clever people, I won’t say it will entirely replace it but it certainly opens your eyes to see what can be done with little effort and could well be used to generate blog post outlines going forward.
Let me know your thoughts on how the generated content reads for you 👍🏻
This is more of a heads up for me / reminder regarding some of the caveats to using ONLINE / RESUMABLE index operations with SQL Server.
Don’t get me wrong, there’s a ton of advantages to using ONLINE and RESUMABLE which I will highlight below but here is the link to the Microsoft Learn page if you want more in depth information
Managing, planning and extending of index maintenance windows. You can pause and restart an index create or rebuild operation multiple times to fit your maintenance windows.
Recovering from index create or rebuild failures (such as database failovers or running out of disk space).
Enables truncation of transaction logs during an index create or rebuild oper
This is fantastic for environments using Always On Availability Groups
Cons
When an index operation is paused, both the original index and the newly created one require disk space and need to be updated during DML operations.
SORT_IN_TEMPDB=ON option is not supported
Disk Space:
At least the same amount of space again required for Clustered Indexes
This is on top of temporary mapping index
Performance:
Resource usage increases due to both source and target structures being in place – up to 2x
This can be a huge issue for some very busy environments
Now that Microsoft Ignite 2022 is over, we’ve all had time to reflect on the announcements made. A little disappointed in the lack of SQL Server 2022 stuff but plenty of exciting Azure changes!
If, like me, you couldn’t attend every session you would like to, well Microsoft have this covered with their Book of News.
There’s a ton of new stuff (very little for Data which is my primary focus) but this gives a great overview of all the latest information. Some of the highlights for me are:
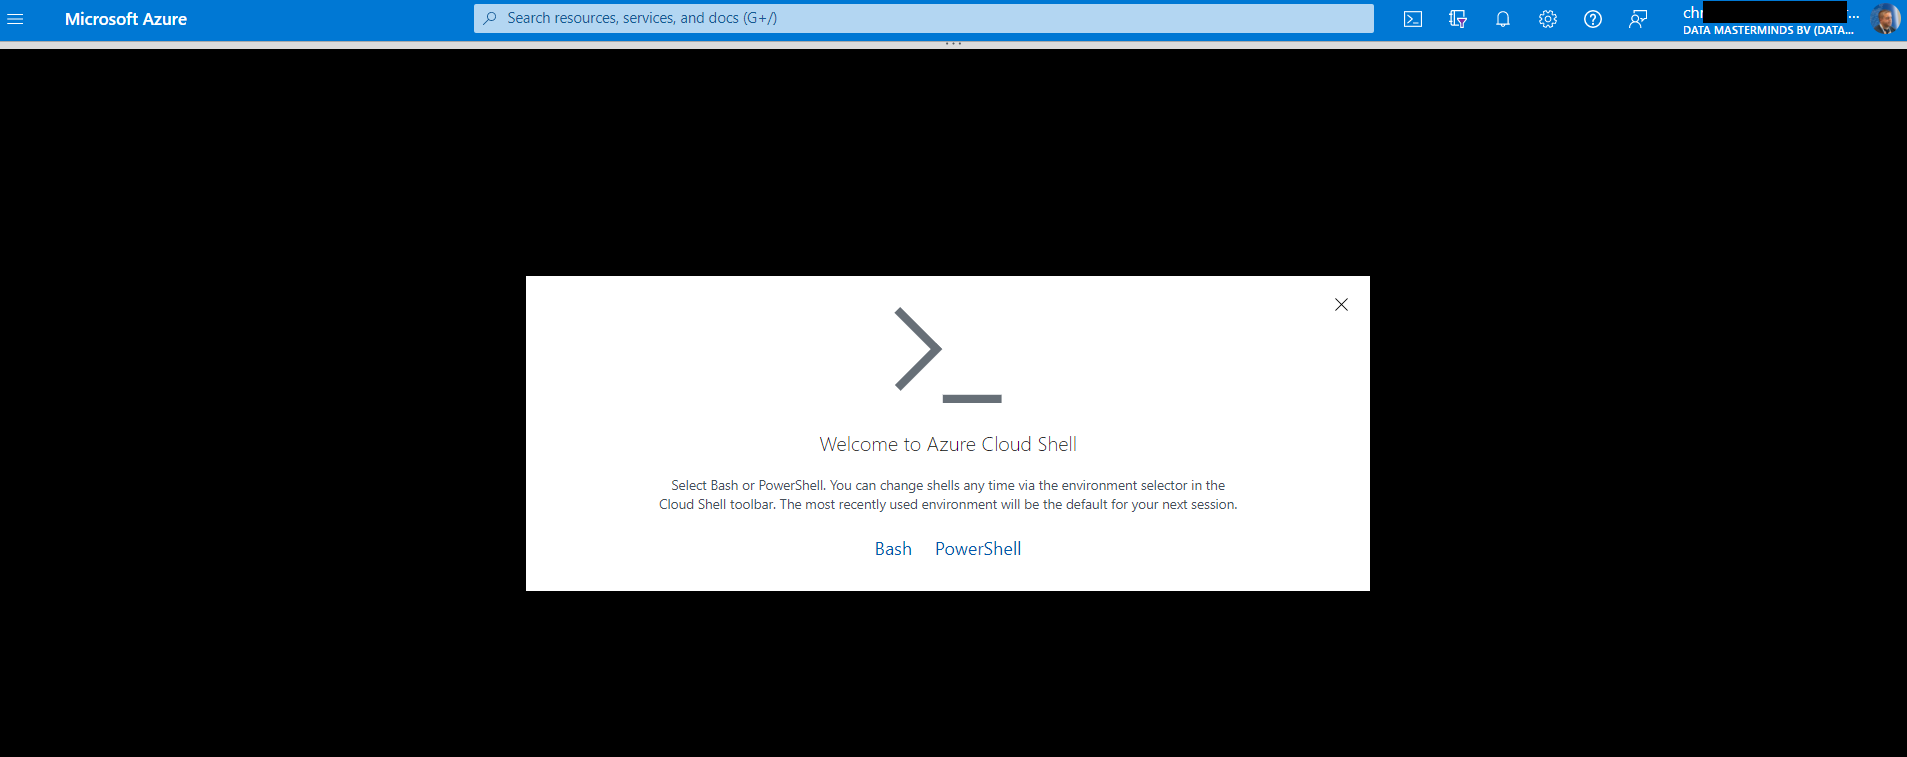
A very short blog post to give a great little shortcut/snippet for those that want to access / work with Azure via the cloud shell but don’t want to navigate to the portal, click, click etc.
Myself, Glen and Mark have been back up and running with the Newcastle Power BI meetup from October 2021 running virtual events which have been a huge success!
We have been recording some of the sessions where the speaker is happy for the content to be shared and have been uploading them to a brand new, hot off the press YouTube channel. This is still work in progress but wanted to get it out there👍
Please check it out, like the videos, subscribe to the channel and just as all the other kool YouTubers say “Make sure you hit the bell!” as we’d love to have 100+ subscribers by the end of January!
Feel free to check out @SQLGeordie’s youtube channel for some Docker/Kubernetes/DevOps recordings, Who knows, I may actually do some more this year 🤷♂️
tldr: Over the years I’ve read a lot of blog posts and watched a lot of videos where they mention that you should have your tempdb files all the same size. What I haven’t seen much of (if any) is what performance impact you actually see if they are not configured optimally. This blog post aims to address that 😉
Introduction
We had a customer experiencing significant performance issues leading to application timeouts (30s) so called on Datamasterminds to investigate. Although this wasn’t a constant performance issue and only ever seen in extremity very infrequently, we were fortunate enough that they had invested in a SQL Server monitoring tool (SQL Sentry) which captured the historical performance.
Analysis
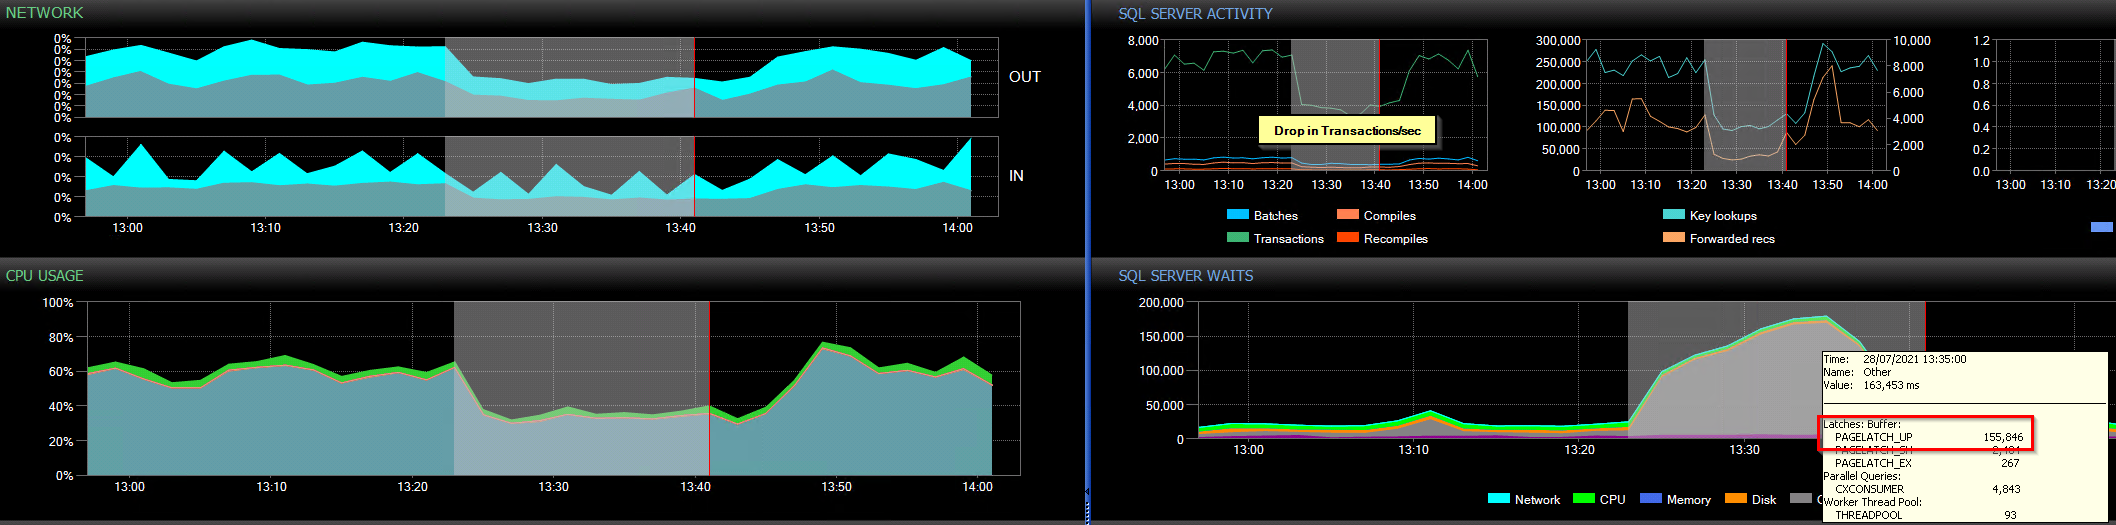
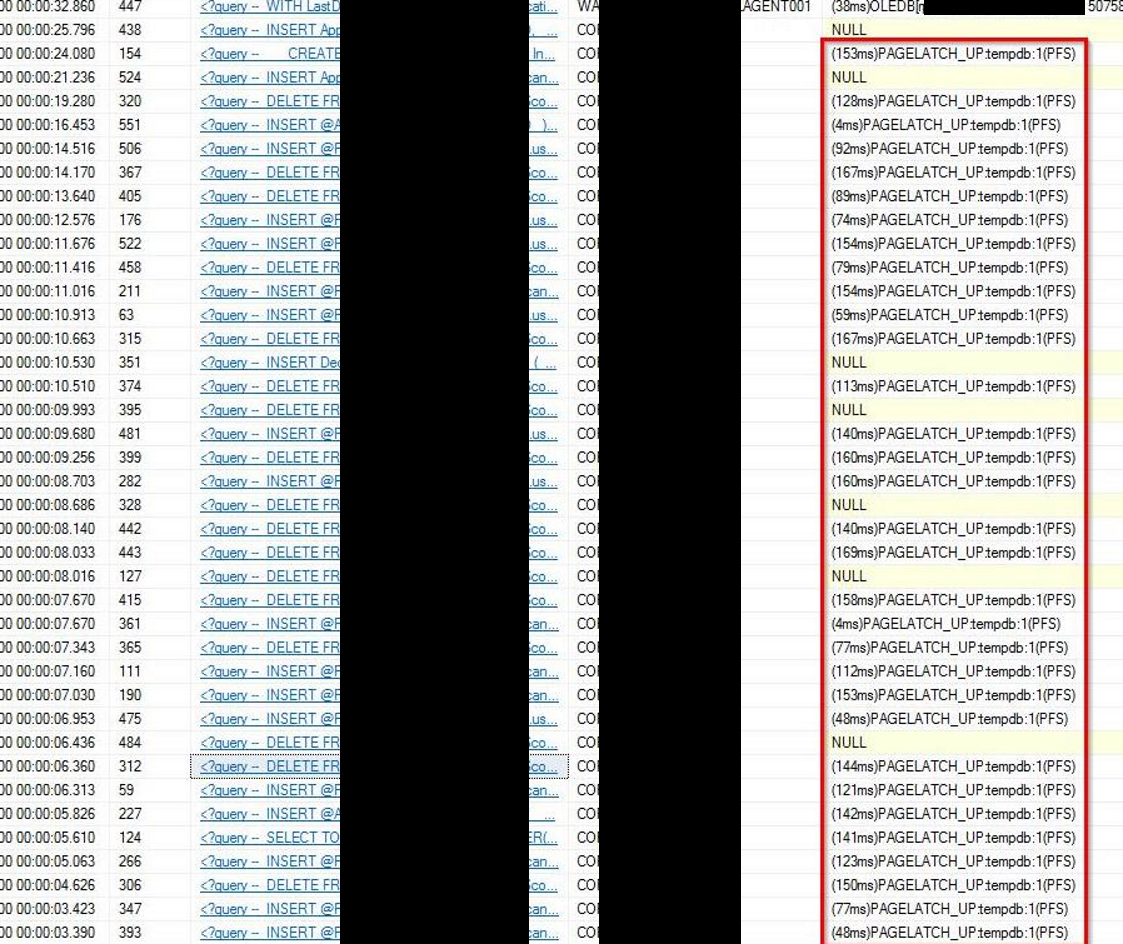
Looking at various noted dates/times where they had encountered performance issues and an example is shown below:
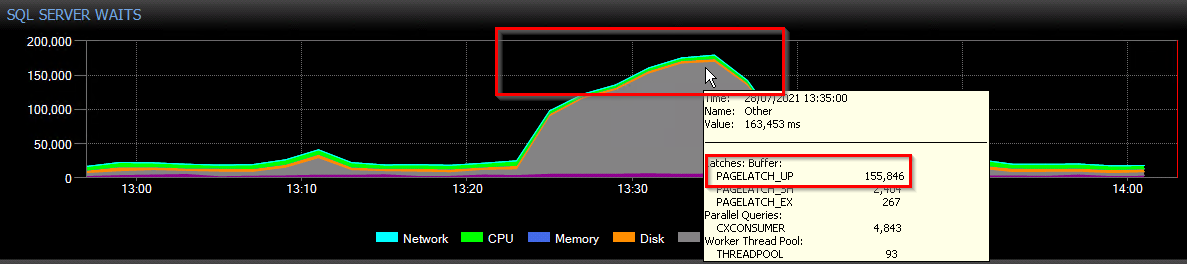
It is obvious to see that it wasn’t pretty during these times, very high PAGELATCH_UP (tempdb PFS) and the dreaded THREADPOOL waits can be seen so we got to work looking at setting up additional monitoring and analysing the database(s) and queries which were running at the time. Long story short, this lead to there being a select few stored procedures creating/dropping a lot of temporary objects and in some cases running a very high number of inserts/deletes to them in loops/cursors. With the queries continuing to come in, the wait times get higher ultimately leading to them being queued and eventually hitting the 30s application timeout.
A good explanation of what Page Free Space (PFS) is can be found over at microsoft docs.
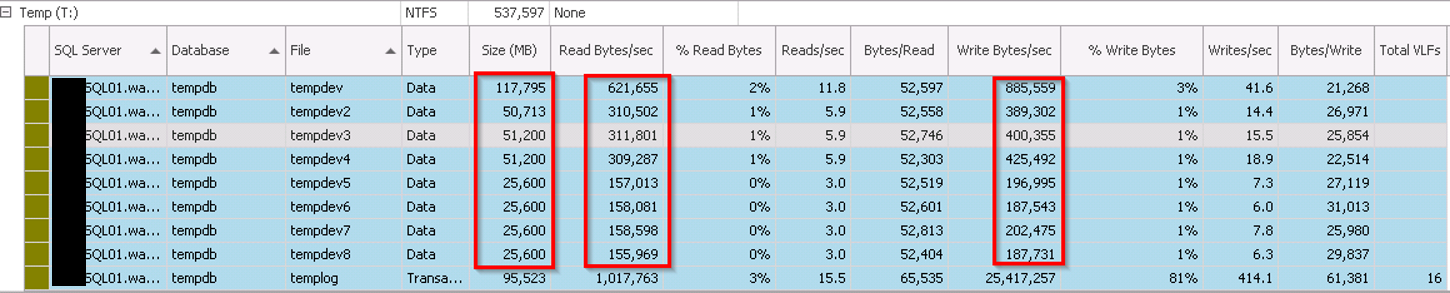
At the time, there were 8 tempdb files but all are different sizes so the usage was skewed. This is because of SQL Server’s proportional fill algorithm where it will try (more often than not) to write to the file with the most free space. In this case, as file id 1 was significantly larger (117GB) than any of the others (25-50GB) so it was the “defacto standard” when writing to tempdb. Ultimately, causing the contention we were seeing.
Tempdb Usage during high wait times can be seen below (taken from SQL Sentry), note the variation in Read/Writes to each file as well as the size differences:
Below is some of the output from sp_whoisactive during the high PAGELATCH_UP wait times. You will see the majority relate to the INSERTS and DELETES to temporary objects…..all in tempdb file id 1.
NOTE: This is just a snippet of the output, the number of queries was in the 1000’s 😲
The Fix
The interim fix was very straight forward, simply resize the tempdb files to be the same size and the proportional fill algorithm worked far better 💪
We’re still working with the customer on the performance tuning efforts to reduce resource usage and contention seen throughout.
The following list from microsoft explains how increasing the number of tempdb data files that have equal sizing reduces contention:
If you have one data file for the tempdb, you only have one GAM page, and one SGAM page for each 4 GB of space.
Increasing the number of data files that have the same sizes for tempdb effectively creates one or more GAM and SGAM pages for each data file.
The allocation algorithm for GAM allocates one extent at a time (eight contiguous pages) from the number of files in a round robin fashion while honouring the proportional fill. Therefore, if you have 10 equally sized files, the first allocation is from File1, the second from File2, the third from File3, and so on.
The resource contention of the PFS page is reduced because eight pages at a time are marked as FULL because GAM is allocating the pages.
Hopefully this blog post gives you an insight into what sort of issue you can see if you don’t take the advice of Microsoft, Consultants or indeed anyone telling you to size all your tempdb files the same 🤔
We’re currently working with a customer on an Archiving project and as part of it trying to reduce their 8.5tb database down to where it should/needs to be (~5tb) in order to be able to restore it in their dev/test environments. Unfortunately adding more disk space in these environments is not an option so as we remove data we are forced to shrink the database files.
I’ll be posting some issues you may encounter when trying to shrink a very large database filled with a ton of (B)LOB data but this post focuses on and issue experienced whilst trying to get the shrink to run.
Although we haven’t pinpointed the cause 100% yet, occasionally there were times when the shrink process would just bomb out after ~2mins with the message below:
File ID 1 of database ID 10 cannot be shrunk as it is either being shrunk by another process or is empty. [SQLSTATE 01000] (Message 5240)
This is usually a message seen when a backup is currently running against that database but in this case it was not. There is a coincidence where the last full backup that run was taking a significantly longer time that it should and this shrink process was trying to run (and bombing out) so it could be linked but to get the process running again there is a little trick you can use and that is to simply increase the database size by “a very small amount”.
In our case we just used 1MB and the script is below:
USE DBNameHere;
GO

SELECT DB_NAME() AS DbName,
    name AS FileName,
    type_desc,
    size/128.0 AS CurrentSizeMB,
    size/128.0 - CAST(FILEPROPERTY(name, 'SpaceUsed') AS INT)/128.0 AS FreeSpaceMB
FROM sys.database_files
WHERE type IN (0,1)
AND DB_NAME() = 'DBNameHere'
GO

-- Use the CurrentSizeMB and add 1MB
USE [master]
GO
ALTER DATABASE [DBNameHere] MODIFY FILE ( NAME = N'DBNameHere', SIZE = 7820225MB )
GO
Hopefully this will be useful for others that may be stuck in a similar situation.
Late last week (20th) we had an emergency call from a company that had a production database go into Suspect mode and needed help. Now this isn’t a great situation to be in so when they then go on to tell us that the last valid backup they had was from the 12th and the backup job had been failing since then – even less of a great situation to be in 😢
There are many blogs and forums posts out there showing the steps to rectify this situation with the main options being
Restore the last valid backup or
Put the DB into Emergency mode and run CHECKDB with REPAIR_ALLOW_DATA_LOSS
Create a new DB and migrate everything to it
The data was in a readable state from the DB in Emergency mode – we were fortunate!
Other options are available in certain scenarios
Depending on your backup strategy, options 1 and 2 can put you in the situation where data loss could occur but with this company the first option isn’t really an option as they would be losing 8 days worth of data.
This is where it started to get interesting, as we discussed what they had tried already they mentioned that they had tried some of the steps in blogs / forums to do option 2 but they were getting an error relating to In-Memory OLTP preventing it. Like many many others, these guys have an In-Mem OLTP filegroup from trying it out once and not being able to remove it but it had been like that for a number of years without causing an issue……..until today.
Aha, so we’re now in an even less of a great situation than the less of a great situation a few minutes earlier 👀. Unfortunately, In-Memory OLTP objects are not checked as part of a DBCC CHECKDB process so option 2 is again not an option. A standard CHECKDB had been run by the guys and returned no errors which helped narrow down the issue to being with the In-Memory OLTP structures as they’re not part of the check.
Another option we did explore as a last ditch effort before option #3 was a slightly modified version of the process from one of Paul Randal’s blog’s on “Creating, detaching, re-attaching, and fixing a SUSPECT database” to try and re-attach the mdf and rebuilding a new log file. That day I learned something new and that this is also not an option for DBs with In-Memory OLTP. Below is a snippet of code to show what I mean for attaching a DB and attaching a new log file.
USE [master]
GO
CREATE DATABASE [DBNameHere] ON
( FILENAME = N'D:\DATA\DBNameHere.mdf' )
 FOR ATTACH_REBUILD_LOG
GO

-- If the above doesn't work then try forcing...
CREATE DATABASE [DBNameHere]
    ON  ( FILENAME = N'D:\DATA\DBNameHere.mdf' )
    FOR ATTACH_FORCE_REBUILD_LOG;
GO
The error that you will get is:
Msg 41316, Level 16, State 0, Line 7 Restore operation failed for database ‘DBNameHere‘ with internal error code ‘0x88000001’. Msg 41836, Level 16, State 1, Line 10 Rebuilding log is not supported for databases containing files belonging to MEMORY_OPTIMIZED_DATA filegroup. DBCC results for ‘DBNameHere‘. CHECKDB found 0 allocation errors and 0 consistency errors in database ‘DBNameHere‘. Msg 7909, Level 20, State 1, Line 10 The emergency-mode repair failed. You must restore from backup.
The “Fix“
So really, the only option now is #3, to copy all the data to a new database following the steps below as a guide:
disable logins so applicaiton will not be able to connect
create new database (without in-memory OLTP filegroup)
script schema / procs / users etc from Emergency mode db
disable foreign keys disable nonclustered indexes
migrate the data
We used the import method from SSMS to quickly / easily utilise the identity seed management but there are other methods available
enable foreign keys (WITH CHECK)
rebuild nonclustered indexes
drop emergency mode db
rename new database back to old name
enable logins
Although this took a while, most of it on making sure the data migrated was indeed correct, they managed to recover their data and are back up and running, albeit with a 1 day outage. These guys were extremely lucky and have learned a valuable lesson about ignoring failed backup errors.
The Cause?
Although we couldn’t 100% say with certainty what exactly happened to cause this, from the error log we could see that a restore of the DB was attempted on a secondary instance and the script did not include a WITH MOVE and it attempted to overwrite the MEM folder for the production DB. These files were locked by SQL Server and the log indicated this also but the problems were being seen not long after and the error from the failed backups relates to missing objects from the MEM folder so it is a likely cause.
Couple of things to take away from this:
Always check and validate your backups
These guys did that every night by restoring this DB to another instance for reporting, their problem was ignoring the backup failures / errors
Be very wary when looking to implement / try out In-Memory OLTP, especially if you’re throwing it straight into production. Once the filegroup is created then it can’t be got rid of and if you are unfortunate enough to encounter corruption and don’t have valid backups then you are in a more difficult situation compared to if you weren’t using In-Memory OLTP
Microsoft Ignite 2021 is currently underway and if, like me, you can’t attend every session you would like to, well Microsoft have this covered with their Book of News.
There’s a ton of new stuff (very little for Data which is my primary focus) but this gives a great overview of all the latest information. Some of the highlights for me are:
NOTE: This blog post references HPE as our example but is relevant to other storage vendors out there. I am in no way affiliated with HPE 😉
Back in the day, “when I was a lad“, the recommendation for SQL Server was to split your data, logs and tempdb files onto separate drives/luns to get the most out of your storage. Jump forward to 2021, is this still relevant and should I be splitting my SQL Server drives on to separate luns on new SAN storage? A question which is often asked not just by customers as well as their 3rd party managed service providers / hosting companies. This question can also be along the lines of, “Why can’t we just put everything on a C:\ because the backend is all on the same lun“. This is slightly different as they’re questioning the drive lettering more than creating separate luns but still relevant to this topic.
The majority (not all) of SQL Servers will have a SAN to host its storage and SANs these days are super duper quick, especially those that have tiered SSD or even fancier, flash storage. The technical differences between the older spinning rust and the new fancy dan flash storage is not something we’ll delve into as there’s plenty of other blogs out there and not really the scope of this blog post.
Each storage vendor will (should) provide their own documentation specific to how the SAN should be configured for SQL Server to get the best bang for your buck. Taking HPE as an example, they have pdf’s for their various offerings including 3PAR/Primera as well as Nimble. Although there are some slight differences, each of them suggest that you SHOULD split your drives onto separate volumes.
I won’t disect the documents in their entirety but some of the sections which will help with answering the question but these mostly relate to which performance policy to set for your data, logs and tempdb based on the workload (ie. OLTP / OLAP and size of files):
Array Snapshots and remote replication
You may not (won’t) want tempdb as part of this due to its large rate of data change
Volume Block Size
According to the documentation, depending on the workload, you may (or may not?) want 8kb for data and 4kb for logs as per their default policy
Caching
Deduplication
Compression
Number of disks available
To provide a great overview, below is a snippet from the HPE Nimble recommendations:
Storage Layout for SQL Server Volumes In general, using multiple volumes for SQL Server deployments offers several advantages: The ability to apply custom performance policy settings to specific volumes • The ability to control cache use for volumes on adaptive flash arrays • The choice of limiting replication of certain volumes, such as the tempdb volume • A gain in performance for I/O-intensive databases, especially if the queue depth of a device is at risk of becoming saturated • The ability to group databases in separate volume collections and apply custom backup and replication schedules • The ability to quickly recover specific databases with volume-based restores Before designing the storage layout, carefully consider the administrative overhead of managing multiple volumes. The ideal solution provides a balance between optimization and administration.
Allocation Unit Size
Something that often comes up during these conversations is the configuration of the volume formatting. Regardless of the chosen Performance Policy and indeed volume block size, the default recommendation from HPE is to use 64kb for your data, logs and tempdb. This is a recommendation, only testing for your specific environment will truly give you the answer as to what allocation unit size to set.
Additional Information
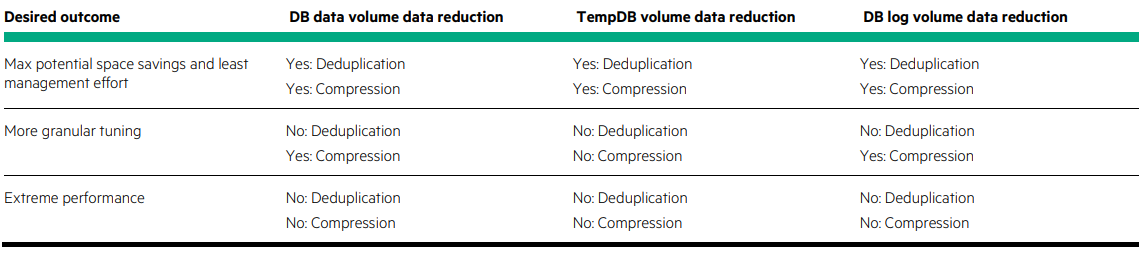
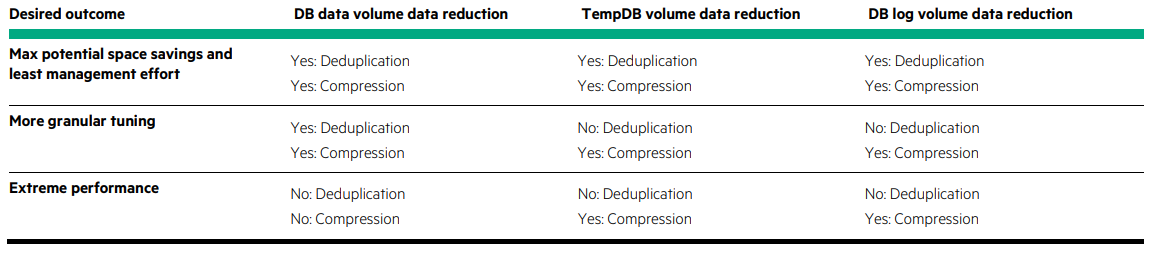
Below are some further snippets from the HPE documentation regarding default configurations:
Comparison of SSD / tiering uses for SQL Server files:
Conclusion
Should you split your SQL Server drives in 2021? The Nimble documentation gives a sentence which sum’s it up very well:
The ideal solution provides a balance between optimization and administration.
Having everything thrown into a single pool will make life a lot easier for the SAN guy, splitting things up could lead to an administrative nightmare but may be required to get the best out of it for your workload.
What I will say is, review your storage vendor’s documentation / recommendations, compare it with what sort of environment / workload you have and if it fits your specific setup, configure it, test it and use it as a baseline to compare with other configurations.
If testing proves that their guide/recommendations do not provide optimal performance for you environment then it is perfectly fine to deviate from their suggested recommendations, as long as the admin overhead is manageable. All I would add to this is that whatever the configuration decision made is, make sure it is fully documented as to why this has been done as someone several years later will no doubt ask the question as to why 🙂